Nginx工作原理全解析:从请求到响应的完整旅程
开场:那台永不宕机的服务器
2019年,我加入一家电商公司,第一天就听到一个传说:“我们的Nginx服务器三年没重启过,每秒处理10万请求,CPU占用不到20%。”
我当时不信。一台服务器,怎么可能这么猛?
后来,我真正理解Nginx的时候,我才知道:这不是传说,这是现实。
今天,全球前1000万个网站中,超过30%在用Nginx。Netflix、Airbnb、GitHub、WordPress.com……这些你天天在用的网站,背后都是Nginx。
它为什么这么受欢迎?它是如何工作的?让我们从一个HTTP请求的完整生命周期说起。
第一章:Nginx的启动——万事俱备
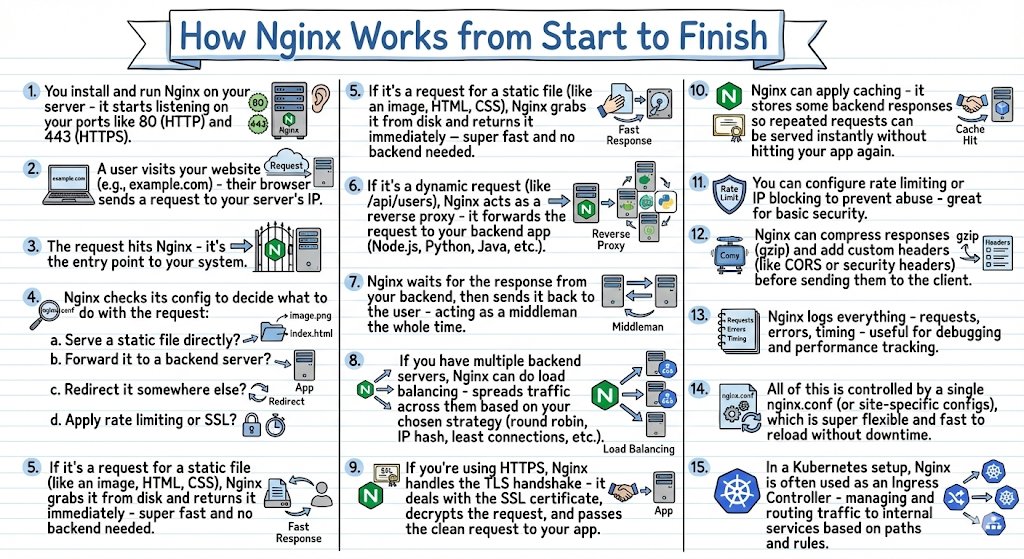
Step 1: 安装并启动Nginx
当你第一次在服务器上运行:
| |
Nginx会做这些事:
1. 启动Master进程
nginx: master process
  └─ 负责管理配置、重载、信号处理
2. 创建Worker进程
nginx: master process
  ├─ worker process 1
  ├─ worker process 2
  ├─ worker process 3
  └─ worker process 4
Worker的数量通常等于CPU核心数。每个Worker可以同时处理成千上万个连接。
3. 监听端口
- 端口80 (HTTP)
- 端口443 (HTTPS)
$ ss -tlnp | grep nginx
LISTEN  0   128   0.0.0.0:80    0.0.0.0:*   users:(("nginx",pid=1234))
LISTEN  0   128   0.0.0.0:443   0.0.0.0:*   users:(("nginx",pid=1234))
现在,Nginx已经准备好接收请求了。
Nginx的架构优势:事件驱动
为什么Nginx能处理这么多并发连接?
传统服务器(Apache):
每个请求 = 一个进程/线程
10000个并发 = 10000个进程/线程
→ 内存爆炸 💥
Nginx:事件驱动
4个Worker进程
每个Worker = 一个事件循环
可以处理上万个并发连接
→ 内存占用极低 ✅
Nginx用的是异步非阻塞架构,就像一个超级服务员,同时盯着100张桌子,谁需要服务就去服务谁,而不是每张桌子配一个服务员。
第二章:请求的到达
Step 2: 用户发起请求
用户在浏览器里输入:https://www.example.com
浏览器做了这些事:
1. DNS解析
www.example.com → 123.45.67.89 (服务器IP)
2. 建立TCP连接
浏览器 ─── SYN ────▶ 服务器:443
浏览器 ◀── SYN-ACK ─ 服务器
浏览器 ─── ACK ────▶ 服务器
3. 发送HTTP请求
| |
这个请求现在到达了你的服务器。
Step 3: 请求进入Nginx
Internet
   ↓
[防火墙]
   ↓
[Nginx:443] ← 请求到达这里!
   ↓
[后端应用]
Nginx成为了你整个系统的入口点(Entry Point)。
就像机场的安检口,所有人都要从这里进,Nginx会决定:
- 你要去哪里?
- 你是否有权限?
- 你的请求是否正常?
第三章:配置文件的威力
Step 4: Nginx检查配置决定如何处理
当请求到达时,Nginx会读取配置文件(通常是 /etc/nginx/nginx.conf),决定如何处理。
配置文件的典型结构:
| |
Nginx会根据URL路径匹配不同的location块,执行不同的操作。
配置的优先级:Location匹配规则
| |
举例:
/api/users→ 匹配location /api//images/logo.png→ 匹配location /images//→ 匹配location = /
第四章:静态文件服务——超快响应
Step 5: 如果是静态文件,直接返回
假设用户请求:GET /images/logo.png
| |
Nginx的处理流程:
1. 检查文件路径: /var/www/static/images/logo.png
2. 文件存在? ✅
3. 从磁盘读取文件
4. 立即返回给客户端
完整的响应:
| |
速度有多快?
- 不需要后端应用处理
- 直接从磁盘(或缓存)读取
- 通常只需要几毫秒
这就是为什么很多网站用Nginx托管静态资源(CSS、JS、图片)——快到飞起。
Step 10: 缓存——更快的响应
Nginx可以缓存后端的响应:
| |
有缓存的情况:
请求 /api/users
  ↓
[Nginx缓存] ← 命中!直接返回
  ✅ 不访问后端
  ⚡ 超快(1-2ms)
无缓存的情况:
请求 /api/users
  ↓
[Nginx缓存] ← 未命中
  ↓
[后端应用] ← 转发请求
  ↓ (处理需要50ms)
[Nginx] ← 接收响应并缓存
  ↓
[客户端] ← 返回
下次同样的请求,直接从缓存返回,减轻后端压力。
实际效果:
- 某电商网站启用缓存后,后端QPS从5000降到500
- 响应时间从100ms降到5ms
- 服务器成本降低70%
第五章:反向代理——Nginx的核心能力
Step 6: 如果是动态请求,转发到后端
假设用户请求:GET /api/users
这不是静态文件,需要后端应用处理。
| |
Nginx变成了反向代理(Reverse Proxy):
客户端
  │
  │ 发送请求: GET /api/users
  ↓
┌────────────┐
│   Nginx    │ ← 接收请求
│ (反向代理) │
└────────────┘
  │
  │ 转发: GET /api/users
  │ + 添加额外头部
  ↓
┌────────────┐
│   后端应用  │ ← Node.js / Python / Java
│(localhost) │
└────────────┘
Step 7: 等待后端响应,充当中间人
后端应用处理请求,返回响应:
| |
Nginx接收到响应后,再转发给客户端。
为什么需要反向代理?
1. 隐藏后端细节
- 客户端只看到Nginx,不知道后面有多少台服务器
- 后端可以随意增减,客户端无感知
2. 统一入口
- 所有请求都经过Nginx
- 方便统一做安全控制、日志记录
3. 性能优化
- Nginx处理慢客户端(Slow Client)
- 后端只需要和Nginx通信,速度很快
实际场景:
慢速客户端 (2G网络,100KB/s)
  ↓ (慢慢传输)
[Nginx] ← 接收完整请求
  ↓ (快速传输,局域网)
[后端] ← 快速接收,快速处理,快速返回
  ↓
[Nginx] ← 接收响应,慢慢发给客户端
后端不用等待慢客户端,可以快速处理下一个请求。
第六章:负载均衡——分散流量的艺术
Step 8: 如果有多台后端,负载均衡
真实场景中,你的后端通常不止一台服务器。
| |
负载均衡策略:
1. 轮询(Round Robin)- 默认
请求1 → 服务器1
请求2 → 服务器2
请求3 → 服务器3
请求4 → 服务器1 (循环)
2. 加权轮询(Weighted Round Robin)
| |
3. IP Hash(会话保持)
| |
用于需要会话保持的场景(如未使用Redis存储Session)。
4. 最少连接(Least Connections)
| |
实际效果:
某网站后端有3台服务器,每台能处理1000 QPS:
- 没有负载均衡:单台服务器过载,另外两台闲置
- 有负载均衡:3台服务器均匀分配,总计3000 QPS
健康检查:
| |
如果某台服务器连续3次失败,Nginx会在30秒内不再转发请求给它。
第七章:HTTPS与TLS——安全通信
Step 9: 处理TLS握手
如果用户访问的是HTTPS(端口443),Nginx需要先处理TLS握手。
| |
TLS握手流程:
客户端                         Nginx
  │                              │
  │─── Client Hello ──────────▶ │
  │                              │
  │ ◀── Server Hello + Cert ─── │ (Nginx的证书)
  │                              │
  │─── Key Exchange ──────────▶ │
  │                              │
  │    🔒 加密通道建立           │
  │                              │
  │─── 加密的HTTP请求 ─────────▶│
  │                              │
  │                         解密请求
  │                              ↓
  │                         [后端应用]
Nginx负责:
- TLS握手(耗时10-100ms)
- 证书验证
- 加密/解密
后端应用收到的是明文HTTP请求,不需要处理TLS。
为什么让Nginx处理TLS?
- 统一管理:证书只需要配置在Nginx
- 性能优化:Nginx可以用硬件加速(AES-NI)
- 解放后端:后端应用不需要关心TLS
第八章:安全与限流
Step 11: 速率限制(Rate Limiting)
防止滥用和DDoS攻击:
| |
工作原理:
用户1: 第1个请求 ✅ 通过
用户1: 第2个请求 ✅ 通过
用户1: 第3个请求 ✅ 通过
...
用户1: 第6个请求 ❌ 被限流(429 Too Many Requests)
burst参数:
- 允许短时间突发请求
- 超过burst后,立即拒绝
实际应用:
- 登录接口:5次/分钟
- API接口:100次/分钟
- 搜索接口:10次/分钟
IP黑名单
| |
第九章:响应处理
Step 12: 压缩与自定义头部
在返回响应给客户端之前,Nginx可以做一些优化:
1. Gzip压缩
| |
效果:
原始响应大小: 500KB
Gzip压缩后: 100KB
→ 节省80%带宽
→ 传输速度提升5倍
2. 添加安全头部
| |
这些头部能防止XSS、点击劫持等攻击。
第十章:日志与监控
Step 13: 日志记录
Nginx会记录每个请求:
| |
访问日志示例:
192.168.1.100 - - [14/Feb/2024:10:30:45 +0800] "GET /api/users HTTP/1.1" 200 1234 "-" "Mozilla/5.0" 0.052
日志分析:
- 哪些接口最慢?
- 哪些IP访问最多?
- 哪些请求返回错误?
- 流量趋势如何?
实用工具:
| |
第十一章:配置管理的哲学
Step 14: 单一配置文件控制一切
Nginx的设计哲学是:一切皆配置。
/etc/nginx/
├── nginx.conf              # 主配置
├── sites-available/
│   ├── example.com        # 网站配置
│   └── api.example.com
├── sites-enabled/          # 启用的网站(软链接)
├── conf.d/
│   ├── ssl.conf           # SSL配置
│   └── security.conf      # 安全配置
└── snippets/
    └── fastcgi-php.conf   # 可复用的配置片段
配置即代码:
| |
零停机重载:
1. 新Worker进程启动,读取新配置
2. 停止接收新请求到旧Worker
3. 旧Worker处理完现有请求后退出
4. 新Worker接管所有请求
整个过程用户完全无感。
第十二章:Kubernetes时代的Nginx
Step 15: Nginx作为Ingress Controller
在Kubernetes环境中,Nginx有了新的角色——Ingress Controller。
| |
Nginx Ingress的工作流程:
Internet
   ↓
[Load Balancer]
   ↓
[Nginx Ingress Controller] ← 路由规则
   ↓           ↓
[Service A] [Service B]
   ↓           ↓
[Pod] [Pod] [Pod] [Pod]
功能:
- 基于路径路由(/api → Service A, /web → Service B)
- TLS终止
- 负载均衡
- 金丝雀发布(Canary Deployment)
- A/B测试
示例:金丝雀发布
| |
第十三章:Nginx的完整请求流程图
让我们把所有步骤串起来:
┌─────────────────────────────────────────────────────────┐
│                   完整请求流程                           │
└─────────────────────────────────────────────────────────┘

用户浏览器
   │
   │ ① DNS解析 + TCP连接
   ↓
┌────────────────────────────────────────┐
│  Nginx (Entry Point)                   │
│  ② 请求到达                             │
├────────────────────────────────────────┤
│  ③ 读取配置文件                         │
│  ④ 匹配location规则                     │
├────────────────────────────────────────┤
│  路由决策:                             │
│                                        │
│  静态文件? ──Yes──▶ ⑤ 直接返回 (fast!) │
│     │                                  │
│     No                                 │
│     ↓                                  │
│  ⑥ 反向代理模式                         │
│     ↓                                  │
│  ⑦ 等待后端响应                         │
│     ↓                                  │
│  ⑧ 负载均衡(多台后端)                 │
│     ↓                                  │
│  ⑨ TLS加密/解密                         │
└────────────────────────────────────────┘
   │
   │ 后端应用处理
   ↓
┌────────────────────────────────────────┐
│  响应处理                               │
│  ⑩ 缓存(如果配置)                     │
│  ⑪ 速率限制检查                         │
│  ⑫ Gzip压缩 + 添加头部                  │
│  ⑬ 记录日志                             │
└────────────────────────────────────────┘
   │
   │ ⑭ 返回给客户端
   ↓
用户浏览器
第十四章:性能优化实战
优化建议清单
1. Worker进程配置
| |
2. 启用HTTP/2
| |
3. 开启Gzip压缩
| |
4. 静态文件缓存
| |
5. 调整缓冲区
| |
6. Keepalive连接
| |
性能监控
实时监控:
| |
访问后看到:
Active connections: 291
server accepts handled requests
 16630948 16630948 31070465
Reading: 6 Writing: 179 Waiting: 106
含义:
- Active connections: 当前活跃连接数
- Reading: 正在读取请求
- Writing: 正在发送响应
- Waiting: 保持连接等待新请求
第十五章:常见问题排查
问题1:502 Bad Gateway
原因:
- 后端服务挂了
- 后端处理超时
- 后端返回了无效响应
排查:
| |
解决方案:
| |
问题2:413 Request Entity Too Large
原因: 上传文件过大,超过Nginx限制。
解决:
| |
问题3:性能瓶颈
排查工具:
| |
尾声:Nginx的哲学
我现在明白了为什么Nginx如此强大。
它不是一个简单的Web服务器,而是一个多面手:
- 🌐 Web服务器(静态文件)
- 🔄 反向代理(动态内容)
- ⚖️ 负载均衡器(流量分配)
- 🔒 TLS终止点(加密处理)
- 🚦 API网关(限流、鉴权)
- 📦 缓存服务器(性能优化)
- 🎯 Ingress控制器(Kubernetes)
它的设计哲学是:
- 高性能:事件驱动,异步非阻塞
- 低资源消耗:一个Worker处理上万连接
- 配置驱动:灵活、易于管理
- 稳定可靠:经过大规模生产环境验证
那台"三年不重启"的服务器,现在我信了。
因为Nginx,就是为这个而生的。
附录:实用配置模板
完整的生产环境配置
| |
虚拟主机配置
| |
推荐资源
官方文档:
学习资源:
- 《Nginx开发从入门到精通》
- 《深入理解Nginx》— 陶辉
实用工具:
- nginx-config: 配置生成器
- nginxconfig.io: 可视化配置工具
- ngxtop: Nginx日志实时分析
监控工具:
- Nginx Amplify: 官方监控平台
- Prometheus + Nginx Exporter
- Grafana监控面板
下一篇,我们聊聊如何用Nginx + Lua构建高性能API网关。
如果你对某个主题感兴趣(如Nginx性能调优、OpenResty、动态配置),欢迎留言。